Chirashi sushi, often called “scattered sushi,” is a vibrant and effortless Japanese dish that brings together the essence of sushi in a bowl. Unlike rolled sushi, chirashi features a bed of seasoned sushi rice topped with an artful arrangement of fresh, colorful ingredients like sashimi-grade fish (such as tuna and salmon), avocado, vegetables, and garnishes like nori strips and sesame seeds. The name “chirashi” means “scattered,” reflecting the casual yet beautiful presentation of the ingredients. This dish is perfect for showcasing the freshness of seafood and offers a customizable, hassle-free sushi experience. Often served with soy sauce, wasabi, and pickled ginger, chirashi is a delightful meal for sushi lovers who want variety without the rolling. Let’s create this stunning sushi bowl at home!
Ingredients (Serves 2)
For the Sushi Rice
- 200g (1 cup) sushi rice (short-grain Japanese rice)
- 240ml (1 cup) water (for cooking rice)
- 3 tablespoons rice vinegar
- 1.5 tablespoons sugar
- 3/4 teaspoon salt
For the Chirashi Toppings
- 100g sushi-grade tuna, sliced into 1 cm thick pieces (about 6-8 slices)
- 100g sushi-grade salmon, sliced into 1 cm thick pieces (about 6-8 slices)
- 4 cooked shrimp, peeled and deveined (optional)
- 1 avocado, peeled, pitted, and sliced into thin wedges
- 1 small cucumber, thinly sliced into half-moons
- 1 small carrot, peeled and julienned (or use a mandoline for thin strips)
- 2 tablespoons edamame, shelled and blanched (or use frozen, thawed)
- 1 sheet nori, cut into thin strips with scissors (about 2 cm long)
- 1 tablespoon masago (fish roe, optional, for a pop of texture)
- 1 tablespoon toasted sesame seeds
- 2 green onions, thinly sliced (for garnish)
For Serving
- Soy sauce
- Wasabi paste
- Pickled ginger (gari)
- Optional: Sriracha or spicy mayo (mix 2 tablespoons mayonnaise with 1 teaspoon sriracha)
Equipment
- Rice cooker or medium pot with lid
- Wooden or plastic mixing bowl (for sushi rice, avoid metal to prevent a metallic taste)
- Sharp knife and cutting board
- Small bowl of water (to wet the knife for slicing fish)
- Serving bowls (wide, shallow bowls work best for presentation)
Step-by-Step Recipe
Step 1: Prepare the Sushi Rice
The base of chirashi is perfectly seasoned sushi rice, which provides a tangy, sticky foundation for the toppings.
- Rinse the Rice: Place the sushi rice in a bowl and rinse under cold water, gently swirling with your hands. Repeat 3-4 times until the water runs clear to remove excess starch. Drain well.
- Cook the Rice: In a rice cooker or medium pot, combine the rinsed rice with 240ml water. Cook according to your rice cooker’s instructions, or bring to a boil on the stovetop, then reduce to low heat, cover, and simmer for 15 minutes. Turn off the heat and let the rice steam, covered, for another 10 minutes.
- Make the Sushi Vinegar: While the rice cooks, combine rice vinegar, sugar, and salt in a small saucepan. Heat over low heat, stirring until the sugar and salt dissolve (do not boil). Alternatively, microwave for 20 seconds and stir. Let it cool slightly.
- Season the Rice: Transfer the cooked rice to a large wooden or plastic mixing bowl. Pour the sushi vinegar over the rice and gently fold it in using a wooden spatula or rice paddle, using a cutting motion to avoid mashing the grains. Fan the rice as you mix to cool it down and give it a glossy finish (you can use a handheld fan or a piece of cardboard). Once cooled to room temperature, cover with a damp cloth to keep it moist.
Pro Tip: The rice should be sticky but not mushy, with each grain distinct. Use it at room temperature for the best texture—refrigerating will harden it.
Step 2: Prepare the Toppings
Let’s prep the fresh toppings that will make your chirashi bowl vibrant and flavorful.
- Prepare the Fish: Ensure your tuna and salmon are sushi-grade (safe for raw consumption). Using a sharp knife, slice each into 1 cm thick pieces, about 3-4 cm long. You’ll need 6-8 slices of each fish per bowl. Keep refrigerated until ready to use.
- Prepare the Shrimp (If Using): If using shrimp, ensure they’re cooked, peeled, and deveined. Slice in half lengthwise if large, or leave whole if small.
- Prep the Vegetables: Slice the avocado into thin wedges, about 0.5 cm thick. Thinly slice the cucumber into half-moons. Julienne the carrot into thin matchsticks (a mandoline helps for uniformity). If using fresh edamame, blanch in boiling water for 2 minutes, then drain and cool. If using frozen, simply thaw.
- Cut the Nori: Use scissors to cut the nori sheet into thin strips, about 2 cm long and 0.5 cm wide.
- Prep Garnishes: Thinly slice the green onions and have masago, sesame seeds, and nori strips ready for assembly.
Pro Tip: Keep fish refrigerated until the last moment to maintain freshness. If using raw fish, ensure your workspace and tools are clean—wash your hands and knife thoroughly after handling.
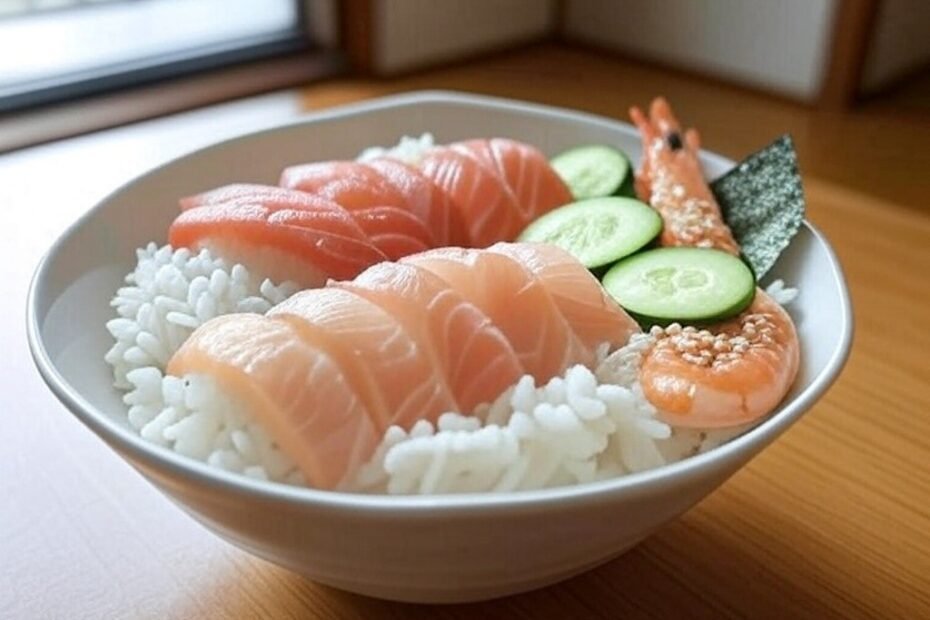
Step 3: Assemble the Chirashi Bowls
Now, let’s arrange the chirashi in a beautiful, scattered style that highlights the colors and textures.
- Divide the Rice: Scoop the sushi rice into two wide, shallow serving bowls, about 1 cup per bowl. Spread the rice evenly to create a flat base, but don’t press it down too hard—keep it light and fluffy.
- Arrange the Toppings: Artfully place the toppings over the rice in small, distinct sections for a visually appealing presentation:
- Lay 6-8 slices of tuna on one side of the bowl, fanning them slightly.
- Place 6-8 slices of salmon next to the tuna, fanning in the opposite direction.
- Add 2 shrimp (if using) near the fish, or in the center for contrast.
- Arrange avocado wedges in a small cluster.
- Add a small pile of cucumber slices and julienned carrots.
- Sprinkle edamame beans in a small section.
- Add a small spoonful of masago (if using) for a pop of color and texture.
- Garnish: Sprinkle toasted sesame seeds over the entire bowl. Scatter nori strips evenly across the top, and finish with a sprinkle of sliced green onions for a fresh, green accent.
Pro Tip: The key to a beautiful chirashi is variety and balance—arrange the toppings in a way that shows off their colors and textures, but don’t overcrowd the bowl. Leave some rice visible for contrast.
Step 4: Serve the Chirashi
Let’s present the chirashi with classic sushi accompaniments for an authentic experience.
- Prepare Dipping Sauce: Pour soy sauce into small dipping bowls for each person. Add a small dollop of wasabi paste and a few slices of pickled ginger on the side. If using spicy mayo, mix 2 tablespoons mayonnaise with 1 teaspoon sriracha and serve in a small bowl.
- Serve Immediately: Serve the chirashi bowls fresh, as the fish is best enjoyed right away. Encourage diners to mix the toppings into the rice as they eat, dipping lightly in soy sauce with a bit of wasabi for a spicy kick. The pickled ginger acts as a palate cleanser between bites.
Serving Tip: Chirashi is traditionally eaten with chopsticks, but a spoon works well too, especially to scoop up the rice and toppings together. Enjoy at room temperature for the best flavor.
Tips for Success
- Sushi-Grade Fish: If using raw fish, ensure it’s labeled sushi-grade or sashimi-grade, and purchase from a reputable source. Freeze the fish for at least 24 hours before thawing to kill any potential parasites (a common safety practice).
- Customization: Chirashi is highly customizable—swap out fish for cooked shrimp, crab sticks, or tamago (Japanese omelet). Add other toppings like sliced shiitake mushrooms, pickled radish, or seaweed salad for variety.
- Vegetarian Option: Skip the fish and use a combination of avocado, cucumber, carrots, edamame, pickled radish, and tamago for a delicious veggie chirashi. Add a drizzle of sesame oil for extra flavor.
- Presentation: Use a wide, shallow bowl to spread out the toppings and show off their colors. Arrange ingredients in small, neat piles rather than mixing them together for a traditional look.
- Storage: Chirashi is best eaten fresh, as raw fish shouldn’t sit out for long. If you have leftovers, store the rice and toppings separately in airtight containers in the fridge for up to 1 day. Assemble fresh when ready to eat again.
Nutritional Information (Per Serving, Approximate)
- Calories: 400-450 kcal (varies by toppings)
- Protein: 20g (more if using fish)
- Fat: 10g
- Carbohydrates: 50g
- Sodium: 600mg (varies by soy sauce usage)
Chirashi sushi is a stunning and delicious way to enjoy the flavors of sushi without the fuss of rolling. Perfect for a light lunch, dinner, or a special occasion, this dish lets the freshness of the ingredients shine.